

Introduction
In modern software development, API call logging is an indispensable part, recording detailed information for each API call of an application. Effective log management enables development teams to monitor API call activities in real time, facilitating prompt issue detection and resolution. While mature logging system solutions exist in enterprises, developers may face challenges integrating logs from early-stage testing services into internal logging systems due to permission restrictions and approval processes, hampering their development efficiency.
The http-logger plugin provided by Apache APISIX facilitates integration with HTTP servers, using the widely adopted HTTP protocol for log reception. This allows developers to easily view API call logs directly, thereby enhancing development efficiency. Below we will introduce how it works and how to use it.
Principles of http-logger Plugin
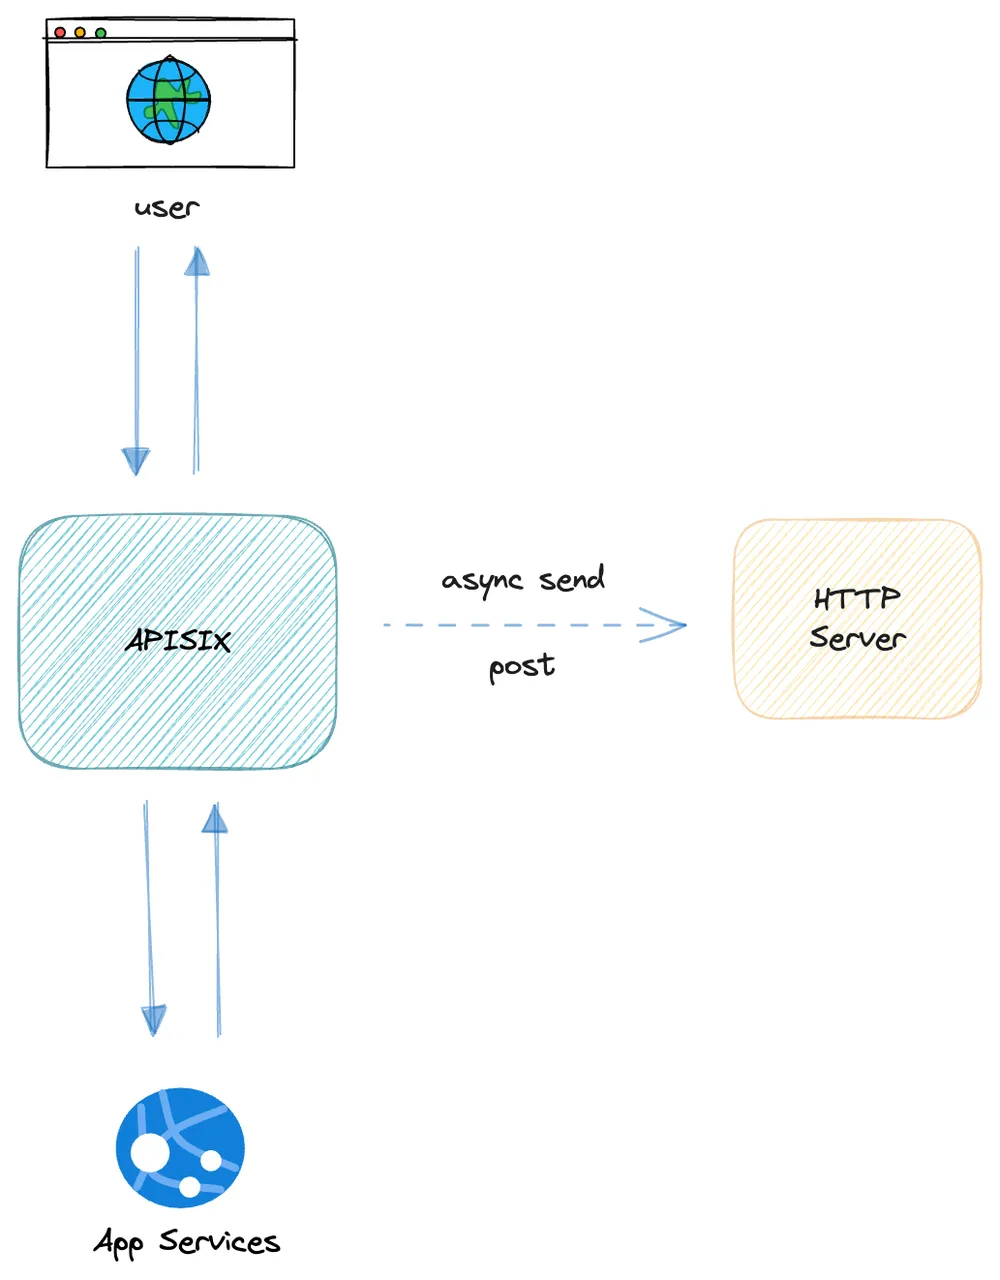
The http-logger plugin in APISIX supports pushing log data to HTTP or HTTPS servers. Its core principle involves processing requests by APISIX upon client initiation, generating access logs, and asynchronously sending request context information, formatted according to specified log formats, via POST requests as JSON objects to configure HTTP or HTTPS servers. This enables viewing API log information on our own HTTP or HTTPS services, greatly improving development efficiency. A flowchart is provided below to illustrate the data flow.
Creating a Simple HTTP Service for Log Reception
Although numerous SaaS products and open-source solutions exist in the market for log management and analysis, such as Loggly, Splunk, and ELK Stack, accessing external networks may be restricted within enterprise networks, posing challenges during the development and testing stages. Therefore, a simple HTTP service can be rapidly developed to collect logs. Below is an example using Node.js:
// httpserver.js
const http = require('http');

http.createServer((req, res) => {
    let data = '';
    req.on('data', chunk => {
        data += chunk;
    });
    req.on('end', () => {
        console.log('APISIX Log:', data);
    });

    res.writeHead(200, {'Content-Type': 'text/plain'});
    res.end(`Hello World\n`);
}).listen(3000, () => {
    console.log('Server running at http://localhost:3000/');
});
The script listens on the local port 3000 and prints the request body of requests to this service endpoint. You can follow these steps to run and test it:
Run
node httpserver.jsto start the service.Use
curl -i http://127.0.0.1:3000/ -d '{"name": "Jack"}'command to access this endpoint.You should see similar output:
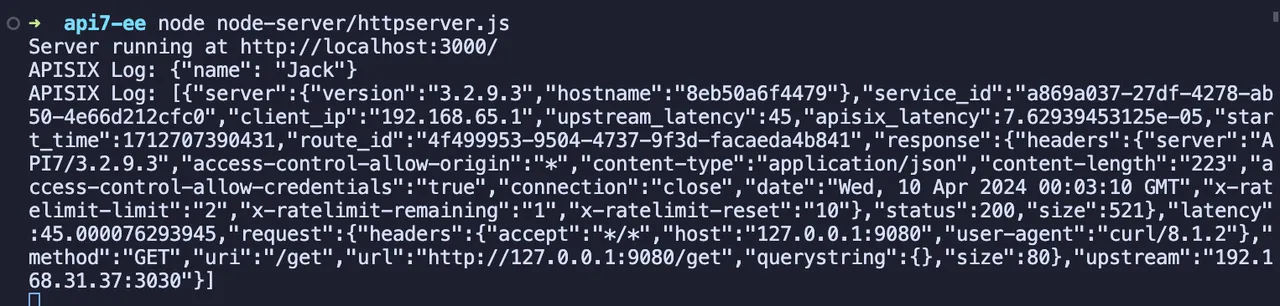
Server running at http://localhost:3000/
APISIX Log: {"name": "Jack"}
Enabling http-logger Plugin in APISIX
Next, let's discuss how to enable the http-logger plugin in APISIX and send logs to the HTTP service created in the previous step.
- Use APISIX Admin API to create a route and enable the
http-loggerplugin:
curl "http://127.0.0.1:9080/apisix/admin/routes/1" \
-H "X-API-KEY: edd1c9f034335f136f87ad84b625c8f1" -X PUT -d '
    {
      "uri": "/get",
      "upstream": {
        "type": "roundrobin",
        "nodes": {
          "httpbin.org:80": 1
        }
      },
      "plugins": {
              "http-logger": {
                  "uri": "http://127.0.0.1:3000/"
              }
        }
    }'
Use the curl command to send requests to APISIX:
curl -i http://127.0.0.1:9080/getYou should then see a similar log output in your terminal.
It can be observed that we have successfully collected logs sent by APISIX.
Customizing Log Formats
The http-logger plugin allows developers to customize log formats to meet various requirements. If only specific fields in log data are of interest, APISIX supports declaring log formats and contents. This can be achieved by setting plugin metadata provided by APISIX.
1. Configure plugin metadata via Admin API:
curl http://127.0.0.1:9180/apisix/admin/plugin_metadata/http-logger \
-H 'X-API-KEY: edd1c9f034335f136f87ad84b625c8f1' -X PUT -d '
{
    "log_format": {
        "host": "$host",
        "@timestamp": "$time_iso8601",
        "client_ip": "$remote_addr"
    }
}'
2.Upon issuing the curl command again, you should see a similar log output:
APISIX Log: [{"service_id":"a869a037-27df-4278-ab50-4e66d212cfc0","client_ip":"192.168.65.1","host":"127.0.0.1","route_id":"4f499953-9504-4737-9f3d-facaeda4b841","@timestamp":"2024-04-10T00:10:31+00:00"}]
Conclusion
Through the utilization of the http-logger plugin, developers not only simplify the log viewing process but also enhance daily development efficiency. This plugin, provided by APISIX, is the simplest and most user-friendly logging plugin, operating on the universally accepted HTTP protocol for network transmission. It allows developers to seamlessly integrate with any HTTP service and flexibly choose log-receiving services.
Additionally, APISIX supports dozens of logging plugins to meet diverse requirements in different scenarios. Whether for simple HTTP log collection, complex log analysis, and monitoring, or high-performance and stability demands, APISIX provides comprehensive support, creating more convenient and efficient systems for users.